
Brakesec Book Club: Hacker Playbook 3 - Chapters 3-4
I am participating in the Brakesec Book Club (@Brakesec on twitter for more info). This time around is the Hacker Playbook 3 by Peter Kim.This post will serve as a hybrid of my personal notes, some insights based on my work experience, and a very informal book review, of sorts, mixed up into one.
Excuses
Well, with the holiday and work and such going on, this post got pushed back, and is well overdue. The chapter 3 portion ended up being much more shorthand notes than the prior posts. I’m also merging it with my chapter 4 notes since both I and the book club are behind by a week.
Chapter 3
The OWASP testing guide is a good reference. It is useful to a new webapp tester for learning initially, and once you know it fairly well you will streamline it to hit the most crucial parts in your tests for efficiency. When you aren’t finding common issues, referring back to the testing guide is valuable to look for other finding areas.
There is a Github checklist version linked later in chapter here.
I think this is based on the prior OWASP list, but it is still useful.
SQLMap
This tool is not covered in detail, instead being mentioned in passing. Learn this tool. Eric Conrad calls it “the buzzsaw” for SQL injection, and it really streamlines a lot. Learn the core concepts manually, but then use the buzzsaw for efficiency.
Bug bounties
To add to the author’s recommendation on bug bounties, a good way to get involved and learn can be to start (or join) a team and work on a the bounty together, agreeing to split any reward (focus on the experience, not the reward). For that matter, do “free” bug bounties when just learning, since they are more likely to have undiscovered bugs.
Bug template generator
This is found at buer.haus.
I may be am paranoid, but I would learn the format and do it manually. Don’t submit your bug details to a third party, even if it’s client-side processing.
Webapp testing tools
-
I’ll +1 the author’s suggestion of using Firefox as primary testing browser - it gives the most control. Chrome is useful too, and when doing a full webapp test it can be useful to use other browsers like Safari and IE/Edge to see if something renders differently or if you get different results. At minimum, use a user-agent switcher in your testing browser so you can see if you get different responses when you change your user-agent.
-
+1 for Wappalyzer in the testing browser. It can clue you into things in use that aren’t obvious at first (even from a source review of main page).
-
+1 Burp Suite - I disagree with the author on this tool being expensive. From a bang-for-buck perspective, it is amazingly cheap, and accessible even for a freelancer or hobbyist.
-
ZAP is a decent proxy to use in Burp’s stead, but Burp is necessary for professional webapp testing. The Free version of Burp is included in Kali and is useful, but is lacking features (no full site scan, and rate limits intruder attacks).
-
Dirbuster: This is effectively included in ZAP in the “forced browse” attack.
-
Gobuster: Very fast, at least for my offline test.
-
+1 to Seclists. There are tons of useful ones on there for enumeration, fuzzing, password cracking, etc.
-
Polyglots are really clever, and I need to learn more about them.
-
BeEF is money for report writing. It’s way better to show screenshots of a browser that has been pwned than just an alert popup script. BeEF is very useful in live testing, though it can be tricky depending on the browser. I am finding it less effective than it used to be as browsers put more and more protections in place. A really good exercise is to play with BeEF as attacker and victim on different browsers and versions, and see which plugins work, which don’t, and what they can do. Note: Configuring BeEF to integrate with Metasploit is crucial for real testing. It’s not that hard but it’s not set up by default.
-
My own suggestion: one way to find blind XSS in a live test environment (assuming there are other active users) is for your popup message to ask that the user contact you. Just detail out who you are, and your email address or phone #, and ask that they notify you if they received the popup, as it is part of a security test. This can be surprisingly effective, though sometimes the call you get is from an irate admin asking why you are spamming their database hundreds of times with garbage entries…
-
XSS hunter is a really cool idea, but:
- There is a privacy issue with using it - namely, your client may not want there to be a record of their web app connecting to this third party that is not controlled by your service agreement
- It will likely go commercial one day and stop being free. Not a deal breaker, especially if they price it fairly, but important to keep in mind.
Express
Express syntax was completely new to me. I’m going to have to note these pages for if and when I run into express in the webapp of a real platform, as I find internalizing these kind of completely foreign new ideas is much easier with a real world implementation in front of me.
Another really good way to learn these platforms is just to build a site using one of them. For example, to learn markdown I built my blog, first using Ghost, then using Jekyll 🙂
JSFuck
This is brilliant. The full list of character mapping can be found here.
This will help better understand why the provided string does what it does, as will the readme of that github repo.
Deserialization, template injection, and XXE were also brand new to me and I need to review and study them further.
To do:
- Review the OWASP testing list again (it’s been a while).
- Join a bug bounty and tinker on the regular.
- Review and play with Express.
Put together or find a nosql injection dictionary (seclists?)Found one- Review and play with deserialization.
- Review template injection.
- Review XXE.
Chapter 4
This chapter is way too long! It should have been split up into two parts, since it covers so much material. On the bright side, much of it is reference material, rather than narrative. It might have worked better breaking it into two parts either on subject or with narrative in one and the reference materials in another.
Password spraying
The majority of the time I use Burp to do this. It doesn’t automate multiple iterations, but I keep track of when I sprayed and manually enter the next password to test while I work on other external tasks. This is in part because I’m paranoid of locking accounts.
Responder
As indicated in the book, Responder is bread and butter. I use it on every internal pentest I run, and I use Inveigh on many of my internal and external pentests, depending on the network segmentation I encounter and the success I have in getting into the network from outside.
Multirelay is also gold for environments where you can’t crack passwords of privileged accounts. If SMB signing is not enabled and you are seeing privileged account hashes flying by, you can often get onto an interesting machine through this tool.
Mimikatz
I’ve noticed that “stock” mimikatz gets caught pretty easily these days, as does nearly any powershell tool such as powerview. Mimikatz can at least be recompiled to obfuscate it, but the powershell tools are more difficult to hide from modern EDR systems.
Bloodhound
All of my love goes to the development team behind Bloodhound. The tool has been gold since it originally debuted at Blackhat 2016, and it only gets better as they keep adding new features. The team is also really accessible to the community on their Slack.
Old is new again - SSH tunneling
Somehow I had forgotten how simple it is to tunnel any protocol via SSH to a VPS. The tip on using the -L flag is crucial for red teams maintaining versatile jump boxes in the cloud, being able to spin up and kill proxy hosts without exposing their true origin.
Lab diagrams
I found the diagrams and the descriptions provided in the book rather confusing for the final lab. While I was able to put together what each step was intended to represent, trying to simplify the various pieces into a lab with just 3 VM targets and a flat network actually made it harder to follow than if the real network infrastructure were in place. Obviously, virtualizing that infrastructure is the challenge, so sacrifices had to be made somewhere.
I drew up my own diagrams to better follow along what was being described in the text and how it would look in a real network environment.
This is a bit more realistic representation of what is being simulated, with DNS infrastructure being in the picture. Realistically, the attacker would also use at least two (maybe three) boxes: one the actual attacker station, the second a VPS to tunnel things through, in case the attack gets detected. The attacker might also use a third box for DNS responses.
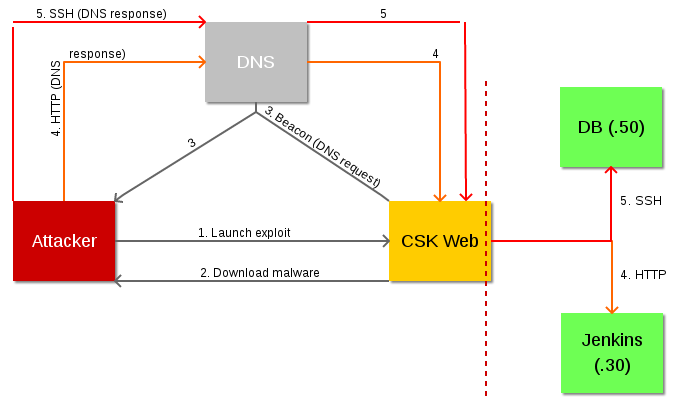
- Through exploiting a vulnerability that grants command execution…
- The attacker gets the vulnerable web server to download a malicious payload (in this case, dnscat2) and run it, compromising the web server with an ongoing session.
- The compromised web server beacons home to the attacker via DNS, but since this is using dnscat2, the beacons actually don’t pass directly to the attacker; instead, they pass through the upstream DNS infrastructure to whatever server the attacker has set up with the dnscat2 listener (for sake of simplicity it’s the same attacker box in the lab and diagram).
- Next, the attacker sets up a proxy for local HTTP traffic to pass through the dnscat session. This is painfully slow, but it allows HTTP traffic ultimately destined for the Jenkins server (bottom right) to reach the machine (which is not reachable directly by the attacker, due to the firewall) by way of the public web server. The traffic actually passes as replies to DNS requests the web server is making. This results in compromise of the jenkins server since it wasn’t very well secured from “trusted” hosts. This helps to illustrate why access to the internal network from a DMZ host should be prohibited, or at the least very tightly controlled.
- After compromising the jenkins server, the attacker finds additional information that allows SSH access to a database server. Another pivot is set up through the same infected web server to pass local SSH traffic (on port 2222) to the target database server. This grants access to that machine and the data that it contains.
There is a ton of content in this chapter, and I’ve only scratched the surface of it.
To do:
- Make a cheat sheet reference from everything in this chapter. It’s all pure gold from a reference standpoint.
- Build up the labs and test crackmapexec.
- Work on decrypting the “secret” payload from the end of the lab!